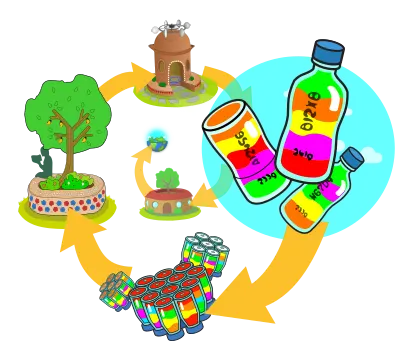
Use your ecobricks to launch your regenerative building journey! The Global Ecobrick Alliance has developed best-practices for building with earth and ecobricks. Our methods are designed to ensure the long-term sequestration of plastic in solid and safe constructions that can be built by anyone anywhere.
The Global Ecobrick Alliance recommends the use of earth and ecobricks to build non-structural, non-load bearing green spaces such as benches, planters, and food forest play parks. By using simple methods to build small-scale inspiring constructions that fully embody regenerative principles, we enable others to copy our constructions. As more and more ecobrickers lead and assist in earth building, more and more plastic is sequestered. And as more and more people get their hands dirty building with earth, more and more we reconnect to the Earth. Its all part of our individual and collective journeys of plastic transition.
Our recommended GEA earth building methods are designed to be both adaptable and scalable. Ecobrick and earth building is fundamentally about working with what resources are locally available– so we encourage you to adapt accordingly to your local context. We encourage you to start by learning from ancestral earth building methods in your region and starting small. By starting small, you and your community can master methods and principles that apply equally to large projects as they do small. Once we have mastered small non-structural applications, we fully envisions homes and structures built with earth and ecobricks.
Caution!
Earth & Ecobrick building is fundamentally distinct from conventional commercial building.
Today’s conventional construction is driven by capital and relies on industrial methods and materials with additive plastic and CO2 impacts (greying). GEA recommended building methods are based on regenerative principles to ensure that their net CO2 and plastic impacts are subtractive (greening).
Green Spaces
Ecobrick & Earth construction is ideal for simple, non-structural green spaces that serve your local community and ecosystem.
The Global Ecobrick Alliance recommends building small scale green spaces that serve your local community. This means that you can enlist the help of your neighbours to not only get the ecobricks you need, but to help you build. Small builds of two to three layers embody can easily embody all the principles of earth and ecobrick building and plastic sequestration and make full use of the unique properties of ecobricks for building.
Horizontally laid ecobricks are ideal for creating curving garden benches/raised-beds where we can sit, play and eat. In particular we recommend design spaces that can be gardened with edible plants (fruit trees, berries, herbs, etc.). Given that most of the plastic we stuff into our ecobricks comes from food packaging, building gardens that grow real food, is pretty apt!
Because Ecobrick and earth building methods are non-capital and replicable, students and youth groups can take full charge of a project– from making the ecobricks, to designing the space, to building and gardening. This creates a sense of pride and ownership that is greatly empowering. Best of all, the earth and ecobrick technique you will learn is indefinitely scalable– these are the same fundamentals used to construct houses and buildings.
Done properly, benches can be stood on and used to play tag. Done poorly, well… a bench does not have the same risks considerations as a wall or structure. Ecobrick green spaces are a great educactional launch into earth building.
Start Real Small
New to earth building? Before building something permanent, its invaluable to experience the full circle of earth and ecobrick building. Making an Earth Module is a super simple way to become acquainted with all the steps of earth and ecobrick building.
A great way to learn the basics of earth and ecobrick building is to put together your own earth module. Earth modules, only use a few ecobricks, yet apply all the steps of the GEA recommended methods. Each of the steps below references one of the more detailed building steps found on this page.
1. Learn from your Ancestors
Earth building traditions were used by our ancestors before industrial construction methods took over. In most places, with a little looking and you can find earth building traditions in your part of the world .
Our ancestors built earthen structures that lasted decades, centuries and in some cases mellenia! Do some research near you to find walls or structures built using earthen techniques. Rather than reinventing methods, you can see how their methods stood up against the unique conditions of your locale– and adapt accordingly for your ecobricking earth constructions.
2. Get to know your earth
Earth is different everywhere on Earth! Before we get started, we get to know our local earth.
The first step is to test the earth that you will use for your construction. Choose a soil near your building site with a high clay content, no stone, and no silt (decayed organic material). Ideally your earth sticks together nicely and can be formed into a ball that holds together.
Of course, soil is different everywhere! A soil’s character comes from the different amounts of sand, clay and silt in it. If there’s too much clay in the earth, it will crack when it dries. If there’s too much sand it will crumble when it dries. If there’s do much silt, it won’t hold together nor be maleable like we need it to be. We can however adjust our local soil to be better for building by adding more sand to it. To do this, we want to figure out the best combination of sand and earth to make your final building material– what we call ‘cob’.
With your chosen earth, make some cob pancakes! It’s just like baking with dirt when you were a kid, but more scientific! Mix small batches of cob with varying ratios of your local sand and clay. Make pancakes of about 3cm by 15cm. Try different rations, like one part sand, two parts clay. Lay out a mix of different rations (i.e. 1:0, 0:1, 1:3, 1:1, 3:1) on a board. Let them dry in the sun and out of the rain. Note that for this testing, we don’t yet add any organic binder (i.e. straw, hay) as we are solely focused on testing the earth. The binder comes later and will add strength to the final cob.
After two or three days, when the samples are fully dry, review your pancakes. Break them carefully feeling how they hold up under pressure.
Based on your review you are now able to make an educated decision on the ratio to use for your project’s cob! Choose the ratio that does not crumble easily, nor which hasn’t cracked. Of course, you’ll also want to factor in things like the transportation and cost of the sand or the cost. Some cracking (especially for the interior of non-structural benches) is not a big deal– and remember, the binder we add will add strength.
Once you have chosen your ideal ratio of sand and earth and have found an organic binder you’re ready to make cob!
Its time to prepare your materials….
3. Choose your organic binder
Cob is made strong by incorporating strong and thin organic fibers
Across cultures and continents our ancestors have used earth to make a building material by reinforcing with local fibers. The choice of fibers was largely determined by what was available! In Europe straw from the local grain harvest was used. In Asia, rice straw or coconut fiber did the trick. In some places, where neither was available horse or even human hair was used.
Organic binder is chosen by its availability, tensile strength and flexibility. In other words, when it is pulled it doesn’t break easily and when it bends it doesn’t snap.
Caution: Although plastic fibers meets all three criteria above– using it in cob goes against our principles of circular design. Once a construction comes to its end, it is impossible to remove the plastic from the cob and use it again. This means that the plastic will certainly escape, degrade and contaminate the local ecosystem.
4. Prepare your materials
To begin, gather your materials and get them ready.
- Earth & Sand: Based on your soil test, you should have a good idea of how much sand and earth you’re going to to need. You’ll need to procure piles of each corresponding to the proportions of your soil test.
- Cob binder: Gather enough of your binder for your project. Keep dry.
- Soak your Earth: It is important to soak your earth before using it, especially if it contains large dry rocky clumps. This will greatly speed up the cob making process and result in a strong dried mortar. Prepare a pit, or raised pool lined with a tarp. For smallers you can use a large basin or oil drum. Fill 3/4 with your chosen earth. Fill the 4/5 with water. Cover to avoid rain spilling it over (and loosing the important sediments) and to prevent it being accessed by mosquitoes.
5. Prepare your building site
Once you’ve chosen the location for your construction, its time to setup your site, bring in your materials and plan the collaboration.
Clear the space where you will be working of all hazards. Make sure that there is plenty of free space to work and move. Allocate a space for mixing the cob, for piling materials, and for tools. Make sure there are no hazards on the ground for when you get started.
Use chalk, or stakes to set out the footprint of your build. Once this is done, you’ll want to give some thought to the pathways and flow of the collaboration. This is particularly important if you’re evolving dozens or hundreds of participants for a large build. Think about where to place your tools and materials for the different teams that will be working on different aspects of the construction.
Plan out the pathways that your teams will move on between work sites, materials, and the build. Try to make sure that the paths do not overlap, and that teams have ample space to work.
6. Dig your foundation
Once you’ve got your bench line figured out and marked with chalk and sticks, lay your ecobricks into the space. Use the loose ecobricks to finalize the footprint of your construction. This will help you put the final touches on the curves of the footprint and determine precisely how many ecobricks you will need. Adjust as you see fit. When all is ready, remove the ecobricks.
Now you’re ready to break ground!
- Dig down 10 cm for the entire footprint of your foundation.
- Place loose ecobricks in the trench to make sure its the right size. Space the ecobricks 4cm apart to estimate how many ecobricks you will need per level.
- Remove all ecobricks, and dirt. Fill the trench with a base layer of medium sized stones.
- Lay the stones so that their tops are level with the ground.
There are two main ways of completing your foundation: with cement or without…
6.1 Non-Cement Foundation
Dig a trench slightly wider than your wall, removing all the top soil
(the rooty stuff) usually 20-50cm deep, until you have a very firm
subsoil base.
Lay medium sized stones in your trench making a free draining
foundation. (A land drain could be added on wetter sites). Tamp
down. It can be infilled with some smaller stones to make it level
with the ground, or a little higher.
It is now possible to build with ecobricks on this foundation/rubble
trench. If you are building a large structure or if ground conditions
are sometimes wet consider raising the walls further from the
ground. The Porthmadog site in Wales is on a flood plain and gets
very wet in winter, so the chosen method combined aspects of the
following examples. It is advised that you examine vernacular
buildings for local, cement free and climate appropriate solutions.
Sustainable architects and engineers can also help with this.
6.2 Cement Foundations
There are various ways to lay your foundation. One option is using a base-layer of cement. The cement is an effective means of preventing your cob bench from seaping up water from the ground, which would undermine its structural integrity. By raising the cement foundation 10cm above the ground, we also prevent seepage in through the benches outer layer in case of pooling rain or flooding.
- Mix cement to a 1:7 ratio of cement to sand/gravel. You’ll be making two batches. The first will be somewhat wet (the constiently of thick soup) and the second will be dryer (the consistency of yogurt)
- Ensure that the stones you’ve laid into the trench are not touching.
- Use a bucket of water to wet your trench and laid stones.
- Pour your first wet mix of cement over all the stones, filling the trench entirely to the ground level. Make sure the cement seeps all the way down between the stones.
- Lay the second mix of yogurt cement over the first. If your first layer has already dried, be sure to score it with stick, then wet it again.
- Using gloves hands lay on the cement and sculpt a raised ten centimer base layer of cement.
- Lay your first level of ecobricks down, resting in the cement. Space ecobricks approxamitely 4 cm apart.
- Make sure that the ecobricks are a minimum of 20% submerged in the cement. Do not submerge more than 40% or they may be un-removeable in the future.
- Let dry over night.
CAUTION: The use of cement in a project has a significant grey environmental impact. The production, shipping and sale of cement is one of the largest sources of human CO2 emissions. It is estimated that for every 1kg of cement 0.5-0.9kg of CO2e is released. If you choose to use cement, be sure that the green impact of your projects (the garden your will grow, the trees in your green space, your sequestration of plastic, etc.) are greater than your grey impacts. Only in this way can you assure that your project is net-green and regenerative.
CAUTION: Be sure that your use of cement does not completely encase your ecobricks– which will prevent them from being removed undamaged in the future.
7. Mash your cob mixture
Now for the fun part. This is where we get everyone involved…
Mix your cob to the ratio that you discovered was best in Step 1. Use buckets to measure each part. Dump the buckets of sand and clay onto a large tarp. Add your organic binder (straw, hay, coconut fibre, etc…).
Use your feet to mash and mix the cob. Add small quantities of water as you go to help the mixing (but not too much or your mix will be too soupy). You want your cob to have the consistency of playdough.
Your mix is ready once there is absolutely no trace of sand grains. Remember, one of the factors in the stength of your cob (and final construction) is how well it is mixed.
8. Make Cob Balls
Cob Balling is a fun and valuable step that helps include just about everybody in the collaboration.
You will know that the mixture is complete when you can no longer see any sand and the entire batch is of the same homogenous consistency. But even then, you can add one more level of mixing to enhance the strength of your dried cob.
When you’re ready, have your team use their hands to make balls out of the mix. Cob balls help refine the mix one last time, and make the cob easier to transport and handy to lay in between ecobricks.
No need for gloves! Cob is 100% safe to handle with your hands, and many builders are even convinced that its therapeutic!
9. Lay the second layer of Ecobricks
Now, its time to produce and lay cob and ecobricks. The brunt of the work is now ahead, but with everyone working together it goes fun and fast!
This is where the earlier layout of your work site pathways is key (Step 3). Have your cob mashing team move to mash on another tarp, while you ball-making team takes over. Once the balls are ready, they are brought to the team compacting them onto the build.
Bang the cob balls around the ecobricks that are set in the cement. Pack the cob all the way down between bottles. It can be helpful to lay small stones between the bottles to take up space and minimize the use of cob.
Make sure that 2cm of the bottom and top of the ecobricks are exposed on the inside and outside of your bench. Later, this space will be filled with your finishing skin-layer of cob.
Cover the ecobricks with a layer of compacted cob approximately 5cm high. Bang your new ecobricks down as you lay this level. Aim for 4cm of distance between the ecobricks below. Keep your horizontal spacing consistent at 4 cm between bottles. Position each new ecobrick in between the two below it.
10. Keep building up layer by layer
Once the bottles are snug in the lower cob layer, fill in any large gaps between bottles (i.e. on curves) with stones. This will help your cob mixture go further. Fill in with cob between the bottles. Add another layer of 5cm on top of the bottles. Bang your new ecobricks down as you lay this level. Aim for 4cm of distance between the ecobricks below.
Keep adding layers of bottles and cob! We find that benches are good with two or three layers of bottles. For walls, add a row of iron re-bar at every 5th layer of bottles.
11. Apply the outer skin
Now its time for the finishing layer! This requires a special mix of cob.
The finishing cob is mixed without binder and using fine sand (i.e. no small stones). Has your cob shown any signs of cracking as it dries? You may also want to add some more sand to your mix. These adjustments help ensure a smooth outer layer with no cracking. Now, you’ve got two choice for your final cob mixture– with cement or without. Each have their advantages disadvantages.
With Cement
Mixing a small amount of cement in with your cob (1 cement : 6 cob) makes a fast drying outer skin that is strong, water resilient and semi-breathable. This is the easiest way to complete a construction and does not require an outer render (Skip Step 7). Cement/cob skin is ideal for playgrounds that will endure much abuse over time. This method however, relies on high-impact industrial cement and requires gloves for safe handling and application. In addition you potentially compomise the reusability of your cob when you’re construction comes to its end– the stiff cement-skin chucks won’t make for pleasant mixing and will need to be removed.
Without Cement
It is also possible to complete your bench without cement. This greatly reduces the additive impact of your bench. When you’re bench comes to its end, all the cob is easily resuable too! You just need to add a little water, re-mash it, and it and your ecobricks can be used again. However, in order to weather proof your bench (water will erode it easily) you must add an outer render. See Step 7.
Process
- Mix your outer skin as you have with your other batch of cob.
- Optional: Mix in 1 part cement to 7 parts cob
- Be sure not to add binder and to use sand without stones.
- Acheive a playdough consistentcy
- Be sure to make into cob balls to ensure a full mixing.
- Wet the outside of your bench
- Smack cob balls onto the outside of your bench. Use your palm to pack the cob down and acheive a smooth surface.
- Be sure to use gloves if you’ve mixed in cement.
To show or not to Show
When finishing your bench you need to choose whether to leave exposed the bottom of your ecobricks, or else to cover them up. Each has its advantages…
- To Show: Leaving the bottom of your ecobricks exposed is a safe way to show that your wall is made from ecobricks. By choosing ecobricks with set bottom colors you can make patterns and even write words. However, the exposed bottoms are succepible to degradation and damage over time. Not recommend on walls exposed to the full sun.
- To Hide: This is the safest way to use your ecobricks… but no one will know your wall is made with ecobricks. There are ways around this by leaving one or two ecobricks exposed, or using glasses to cover the ecobrick.
- Caps: We do not recommend leaving ecobrick caps exposed on walls facing the outdoors as the HDPE plastic degrades quickly with even small amounts of sun exposure.
12. Outer Render
If you opted not to use cement in your skin-layer then you’ll need to finish with an outer render
The final layer of earthern constructions is ancient art form that is highly specific to your local materials and climate. The best place to start is to research the ancestral earth building traditions in your region. Time is the true test! Look for building built before the 1900’s and research how their walls were finished. There are several main methods…
- Using a comibination of fine sand and cow dung
- Using a mix of lime and sand.
- Using egg whites, lime and sand.
A modern alternative is to coat with transparent acrylic (non-oil based, non-plastic) paint.
13. Cement bench top with broken tiles
Complete your ecobrick and earth bench with colorful pattern of inlaid broken tiles.
For benches that will be sat and played upon, adding a protective top layer is important. Broken tiles are a great way to add character and color to the bench.
Be sure to prepare your broken tiles before you mix the cement. The last thing you want to do is rush to figure out your pattern while your cement is drying!
Sort broken tiles into bowls of color. Using a flat board, lay tile out your tiles in the desire pattern
Mix cement at 1 part cement : 6 parts sand. Be sure to use sifted sand with no stones. Score and wet your the top of your cob bench. Apply the cement with gloved hands at a minimum thickness of 5 cm. Use a trovel to smooth the top.
Move your board beside your bench. While the cement is still wet, press the broken tiles 3/4 of the way into the cement. Once semi-dry, use a trowel to cover with a layer of fine cement (1:4 mix). Use a wet sponge to continually wipe clean.
Earth Building Principles
Earth and ecobrick building is fundamentally different from industrial building.
Regenerative
Ecobricking is a what we call a regenerative technology. Rather than “sustaining” the status quo, we’re careful that everything we do re-greens rather than greys.
Circular Design
Ecobricks are a deep solution to plastic. Ecobricks and all the applications on this site are a fundamentally ‘Cradle-to-Cradle’.